Dateline Manual
For Dateline on the Mac · Updated November 10, 2026
This is how to use everything in Dateline, from the first launch to the keyboard shortcuts. If something here doesn't match what you see, or you're stuck, send me a message.
1. Getting started
You need a Mac with macOS 14 (Sonoma) or newer.
- Download Dateline.dmg, open it and drag Dateline onto the Applications folder. Then open Dateline from Applications.
- When your Mac asks whether Dateline may use Calendar and Reminders, click Allow for both. Without them there is nothing to show.
- Dateline asks for your location only the first time you use something that needs it, such as drive times or sunrise and sunset.
Dateline opens on the current time, and comes back to it each time you return to the window.
2. Your calendars
Dateline shows the calendars already set up on your Mac: iCloud, Google, Exchange and anything else in Apple Calendar. There's no new account to make. Anything you add or move in Dateline also shows up in Apple Calendar and on your other devices, and the other way round.
Adding an account
Open Settings > Accounts. You can sign in to iCloud or Google right there, or add any other account through your Mac's Internet Accounts. Accounts you add in Dateline also let you drop attachments onto events.
Showing and hiding calendars
Tick or untick a calendar in the sidebar. Press S to hide or show the whole sidebar. Each sidebar group opens and closes with the arrow next to its name.
Calendars from a web address
Choose File > Subscribe to Calendar and paste the address of a school schedule, sports fixtures or a holiday list. You see a preview first, then pick a name and color, how often it updates, and whether its events alert you. The same window has a short list of ready-made calendars, such as holidays and moon phases.
3. Moving around
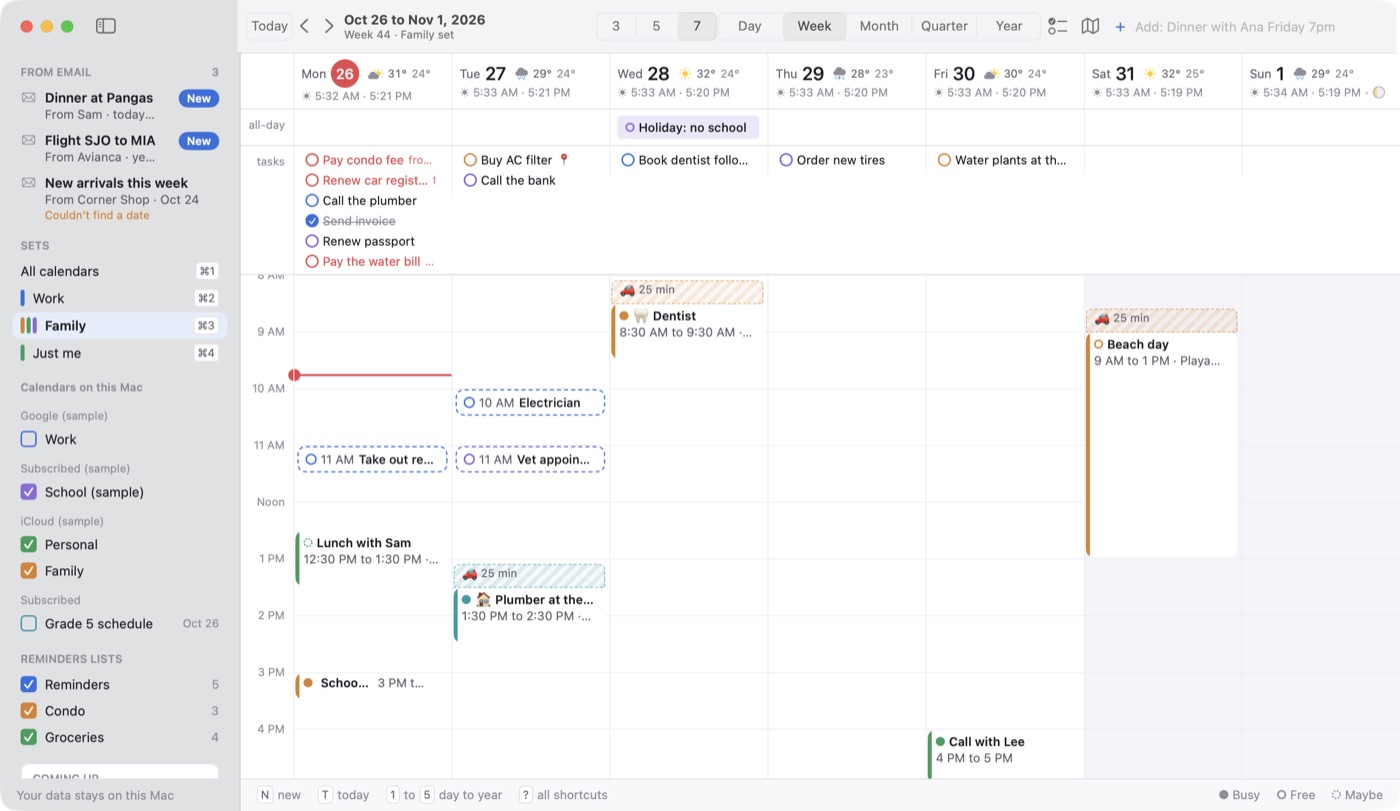
- Views: press 1 day, 2 week, 3 month, 4 quarter, 5 year. They are also in the View menu.
- Days in the week: View > Days in Week shows 3, 5 or 7 days.
- Today, back and forward: T jumps to today, and the left and right arrow keys step back and forward.
- A busy day: in the month or quarter view, click "N more" on a full day to see all of its events in a small pop-up.
- Search: press ⌘F and type. Coming events show first, then past ones. Click one to jump to its day.
Under each day you'll find the week number, sunrise and sunset, and the moon phase. The "Coming up" card in the sidebar counts down to your next event and your next all-day event.
4. Adding events
Type a sentence
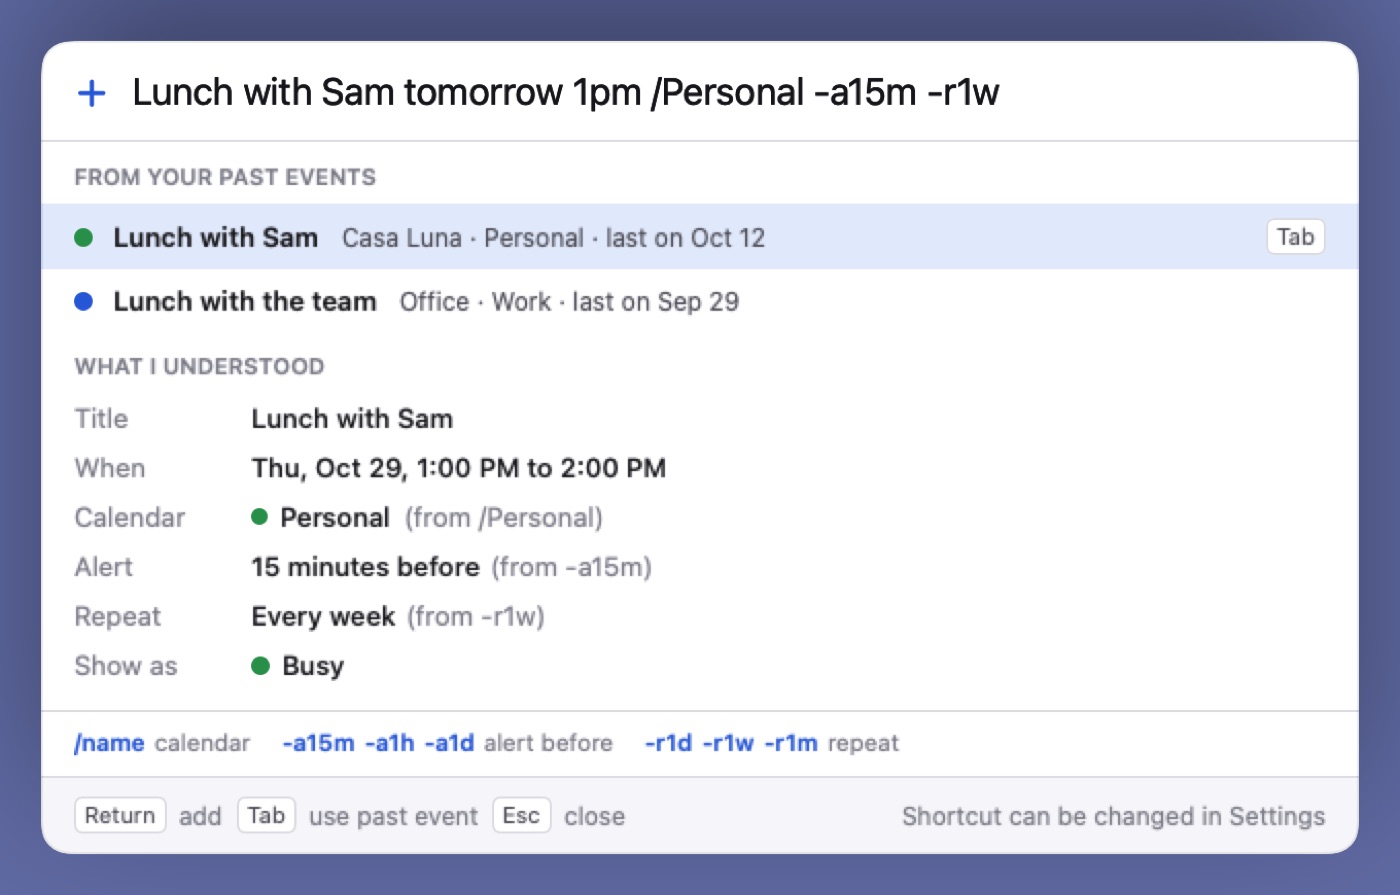
Press N (or click the add box at the top) and type the event the way you'd say it, for example "Dinner with Ana Friday 7pm at Casa Luna". Dateline fills in the title, day, time and place, and shows a preview of what it understood. Press Return to add it.
Short codes
/namepicks a calendar, for example/Personal.-a15m,-a1hor-a1dadds an alert 15 minutes, 1 hour or 1 day before.-r1d,-r1wor-r1mrepeats it every day, week or month.
As you type, Dateline suggests events you've added before. Press Tab to reuse one.
Other ways to add
- From any app: press Control Option Space wherever you are. You can change these keys in Settings > General. Quick add is also in the menu bar icon's menu.
- By double-clicking: in the month or quarter view, double-click a day to start an event on it. In the week view, you can turn on a small bubble that opens right where you double-click.
- From an email: save the email as a file, then choose File > Make Event from Email File. Apple's built-in AI reads it on your Mac and drafts the event. Anything it guessed has an orange outline, and nothing is added until you say so. This needs Apple Intelligence on macOS 26 or newer.
5. Changing events
- Move: drag an event to another time or another day.
- Make it longer or shorter: drag its bottom edge.
- Copy: hold Option while you drag, and the original stays where it was.
- Nudge: select an event and press Option ↑ or Option ↓ to move it 15 minutes.
- Pick the next one: the up and down arrows select the previous or next event. Return opens it.
- Delete: select it and press Delete. Dateline asks first, because the event goes from that calendar on every device that syncs it.
- Undo: ⌘Z takes back your last change, including a delete.
6. Inside an event
Open an event (double-click it, or select it and press Return) and its details show in a panel on the right.
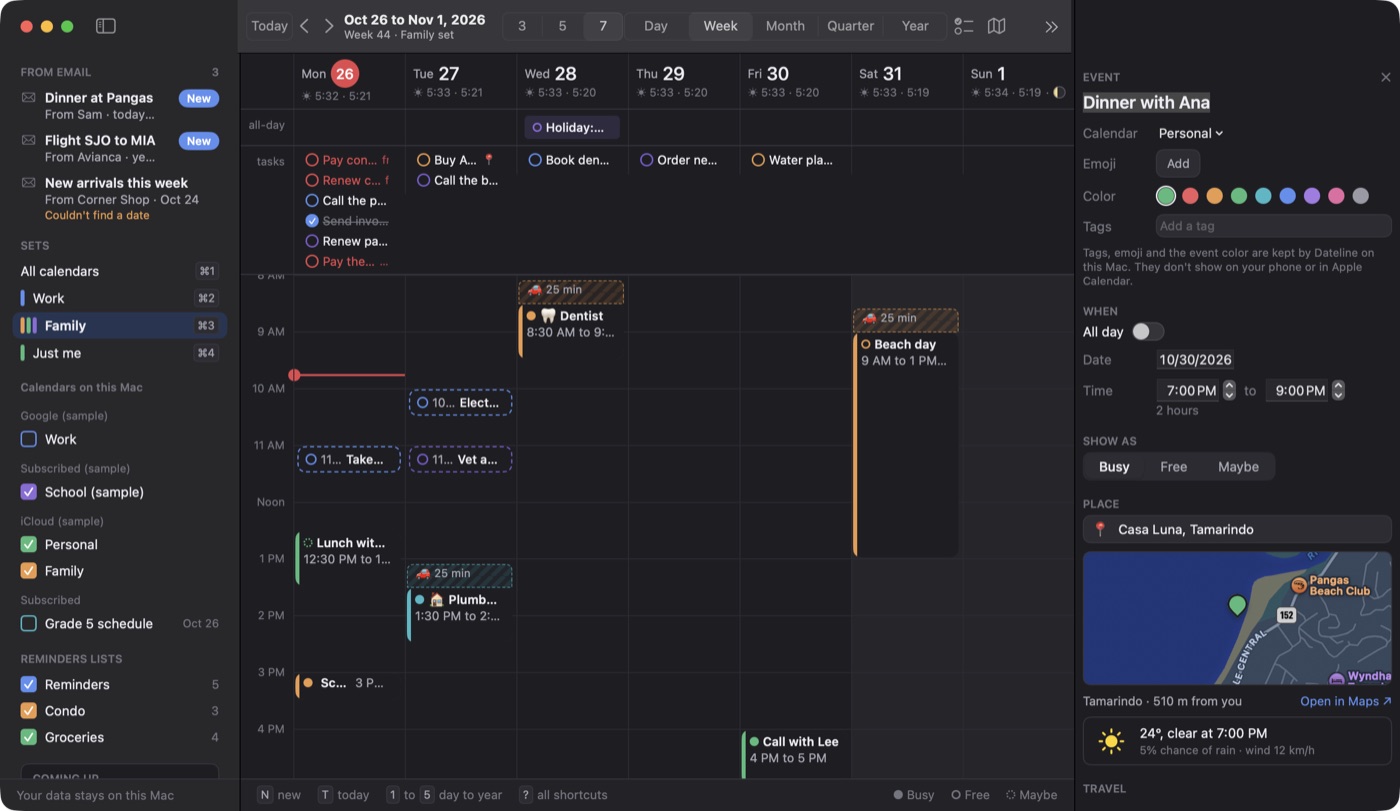
- Join button: if the event has a Zoom, Google Meet or Teams link, a Join button opens the call in one click. You can also copy the link.
- Busy, Free or Maybe: sets how the event shows on your time.
- Notes: bold, italics, links, bullet lists and checkboxes. The text reaches your calendar on other devices; the bold and italics stay on your Mac.
- Attachments: drop files onto events in iCloud or Google accounts you added in Dateline's Settings. On Google they go to your Drive.
7. Sets, tags and colors
Calendar sets
A set is a group of calendars you switch to in one step, such as Work, Family or Just me. Make one with File > New Set, pick its calendars and a default calendar for new events, and choose its shortcut. ⌘1 always shows every calendar, and ⌘2 to ⌘9 switch to your sets. Change them later with File > Edit Sets.
Tags, emoji and colors
In an event's details you can add colored tags, an emoji, and a color of its own that's different from its calendar's color.
Tags, emoji and event colors are kept on your Mac. That's why they work on invites and read-only calendars too, but it also means they don't show up on your phone or in Apple Calendar.
8. Tasks
Your Apple Reminders show on their day in the calendar, and anything you change is saved back to Reminders.
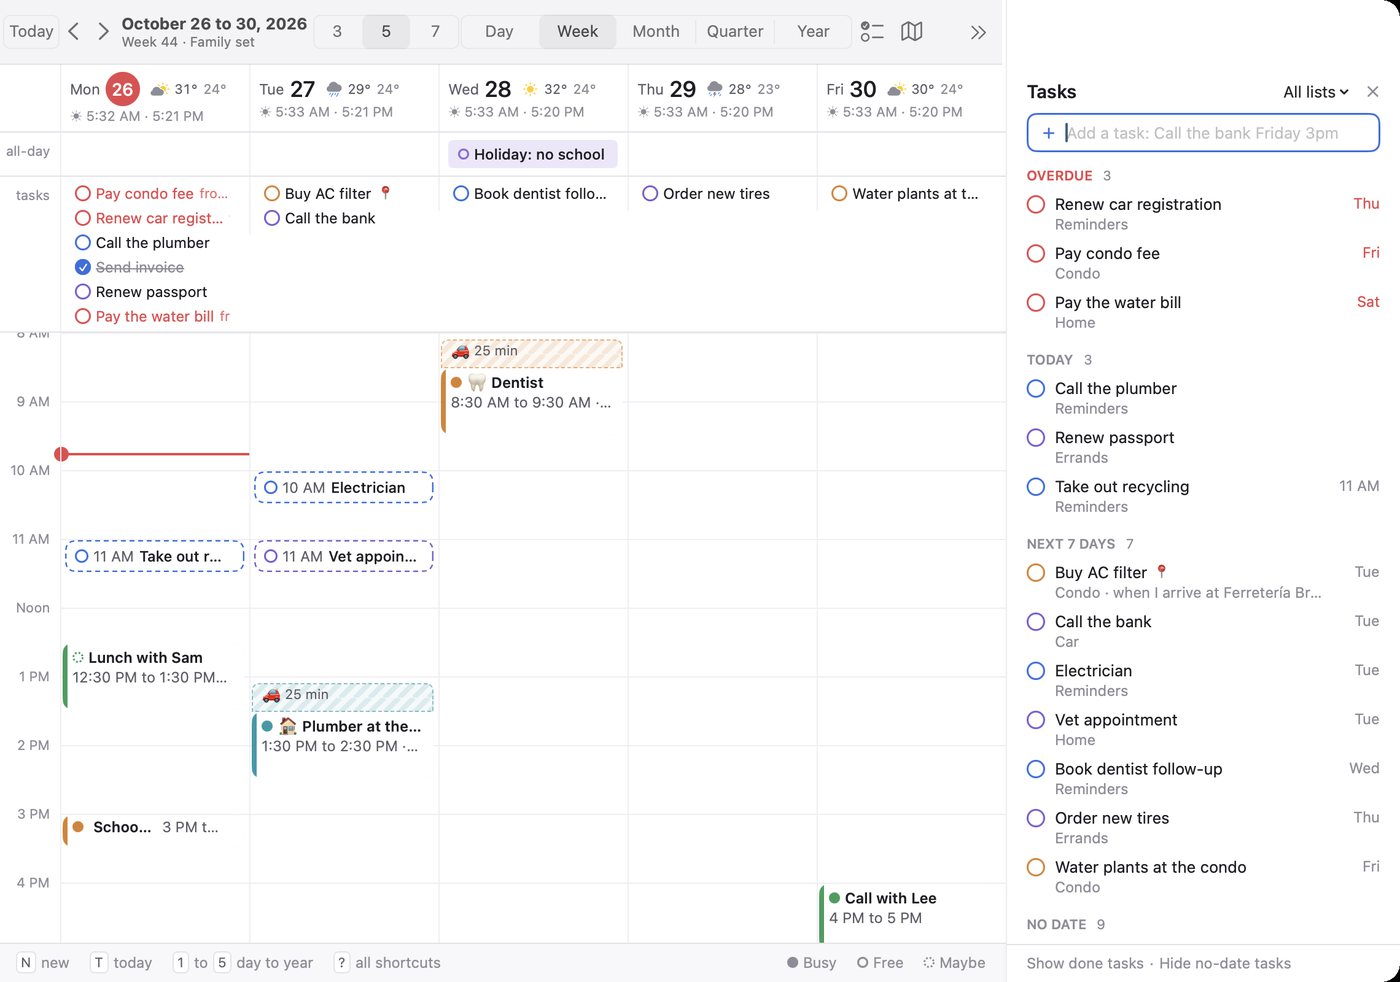
- Task panel: press R for overdue, today, next 7 days and no-date tasks, grouped by list. You can filter it to one list.
- Which lists show: tick the Reminders lists you want in the sidebar.
- Done: click the circle next to a task.
- Change a task: set its date, time or list right in Dateline.
- Carry over: a task that isn't done shows on today until you finish it.
- Reminders by place: a task can go off when you arrive at or leave a place, including Home and Work from your contact card.
- Delete: right-click a task, press Delete, or use the button in its details. ⌘Z brings it back.
9. Places and drive times
- Adding a place: start typing the place's name in an event and Apple Maps suggests it.
- A map in each event: any event with a place shows a map. Click it to open the place in Apple Maps.
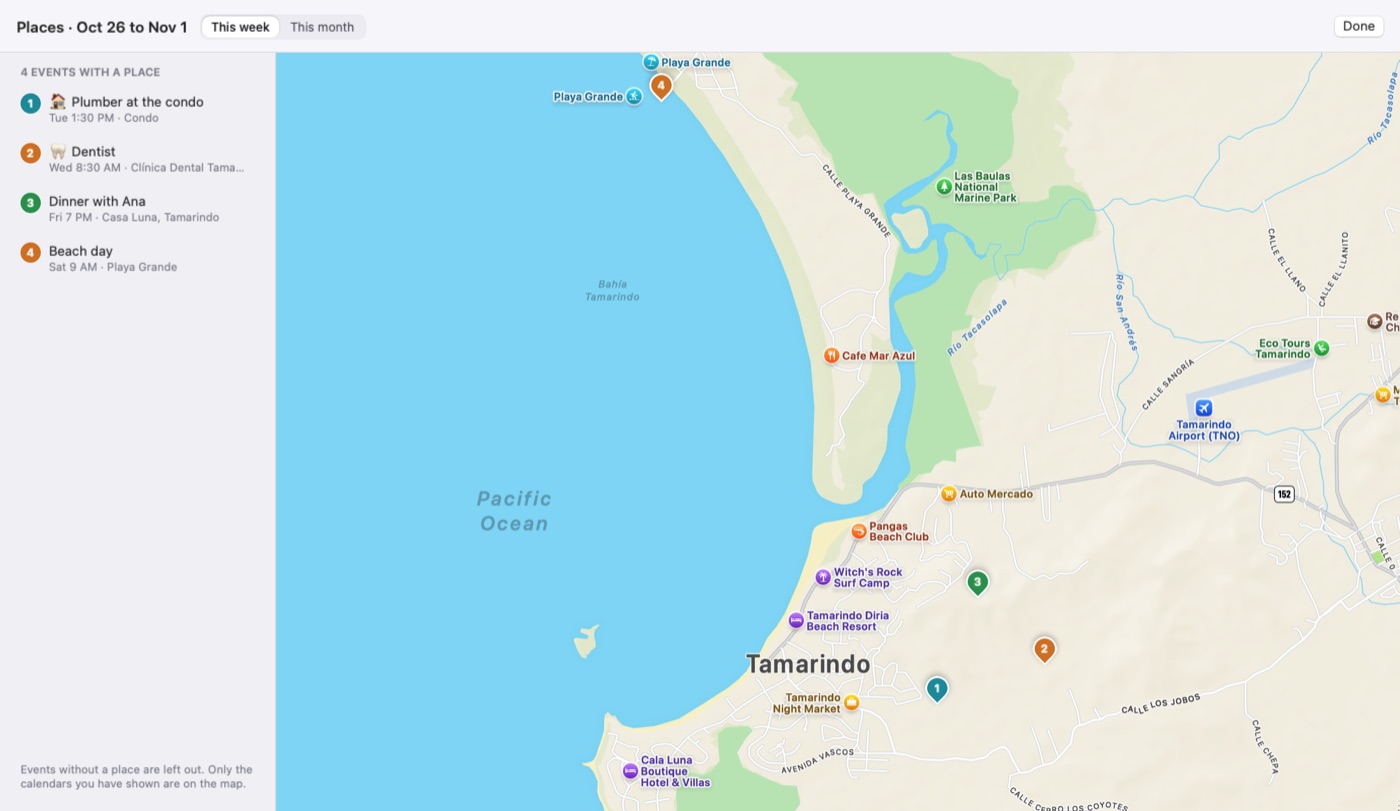
- Map of your places: press P for a map of every place in the view you're on, as numbered pins in order. Events without a place, and calendars you've hidden, are left out.
- Drive time: a striped block before an event shows how long the drive takes, so you don't book over it. The block is in Dateline only, not on your calendar. Drive times come from Apple Maps, and are checked again an hour before to count traffic. You can start from where you are, Home, Work or your last event.
- Time to leave: Dateline can tell you when it's time to go. You can turn this off for any one event.
10. Alerts and the menu bar
Full screen alert
In Settings > Alerts, turn on "Cover the screen when an event starts" and choose which calendars use it. It can come at the start, or 1 or 5 minutes before. All-day events never cover the screen, and it stays away while a Focus such as Do Not Disturb is on. On the alert, press J to join a call, S to snooze 5 minutes, O to open the event, or Esc to close it.
Sounds
Also in Settings > Alerts, pick a sound for events, tasks, leave alerts and the full screen alert, or no sound. Normal alerts stay your Mac's usual banners; only the sound changes.
Menu bar icon
In Settings > Look, choose what the menu bar icon shows: today's date, the day and date, the week number, or your next event. Click it for today's events and tasks, plus quick add, without opening the full window.
11. Time zones and weather
Open Settings > Time & weather.
- Time zones: add up to six cities to the sidebar. Give each a nickname, like "Mom", and drag the rows to change the order. Clocks change for summer time by themselves.
- Weather: turn it on, pick your town and Celsius or Fahrenheit. The forecast shows on each day, and an event with a place shows the forecast for that place in its details.
12. The look
In Settings > Look, choose light or dark (or follow your Mac), the font, the text size, how packed the calendar is (roomy, normal or compact), and how tall each hour is in the day and week views.
In Settings > Week, set the first day of the week and your working hours. Hours outside work get a light stripe.
13. Using Dateline with Claude
If you use the Claude desktop app, Claude can look at your events, add new ones and change existing ones. It can never delete anything. This is off until you turn it on.
- Make sure Dateline is in your Applications folder.
- Open Settings > Assistant and turn on "Let AI apps use Dateline".
- Click Connect next to Claude, then quit and reopen the Claude app once.
On the same tab you choose whether adding or changing an event needs your yes each time, always, or never; which calendars it can see (a calendar you leave out stays out); and which apps are allowed, each with a Remove button. "What it did" lists every change Claude made, with Undo.
14. Trial, key and updates
Free trial
Every copy starts with a 7 day free trial. After that your calendar is still there to look at, but adding and changing events needs a key.
Entering your key
Buy Dateline once on Payhip. Your key comes in the email from Payhip. Paste the whole key into Settings > General, under "Already bought it?". The same key works on a new Mac.
Updates
All updates are free. Choose Dateline > Check for Updates, or in Settings > General have it check every day and, if you like, install without asking. Your settings and calendars are kept.
15. Keyboard shortcuts
Press ? in Dateline, or choose Help > Keyboard Shortcuts, to see this list in the app.
| New event | N |
| Quick add from any app | Control Option Space |
| Go to today | T |
| Day, week, month, quarter, year | 1 to 5 |
| Previous or next | ← → |
| Previous or next event | ↑ ↓ |
| Open event | Return |
| Delete event | Delete |
| Move event 15 minutes | Option ↑ Option ↓ |
| Copy event | Option drag |
| Undo | ⌘Z |
| Find an event | ⌘F |
| All calendars | ⌘1 |
| Calendar sets | ⌘2 to ⌘9 |
| Tasks | R |
| Map of places | P |
| Hide or show the sidebar | S |
| All shortcuts | ? |